mantua easy draft

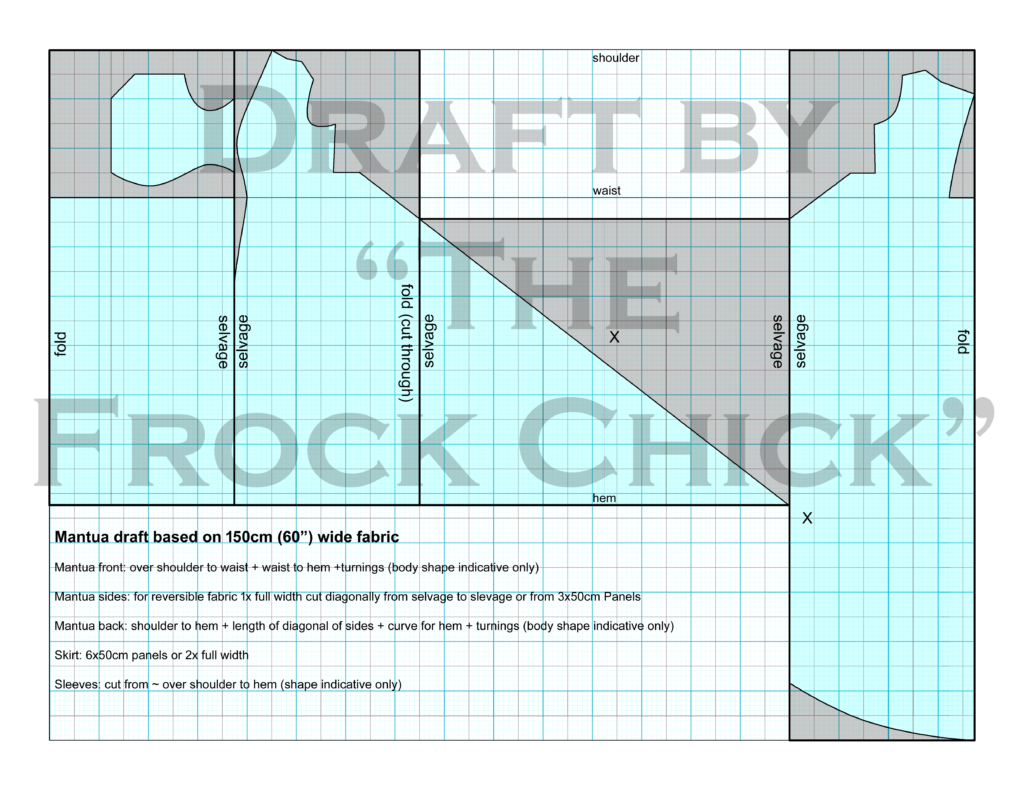
I spent a day digitising a cheat draft for a mantua. It’s very similar to Hunnisett but what I have tried to do was show the rationale behind it.
It uses minimal measurements just like the originals. From left to right are the discreet drops of fabric that can be torn before any cutting or pleating is started.

My previous overlays of extant mantua show a fabric width of between 50 and 65cm in silk and over 100cm in wool. So I have tried to show the pattern shapes on 150cm/60″ wide fabric. But I also tried to indicate 50cm divisions.
The front length is taken from behind the shoulder to waist to hem (over hips) plus turnings. Here the front is 185cm to include a generous turning (10xm.)
The side widths are extensions cut from the full width, here I have limited to the width of the fabric but these could be cut wider by butting more fabric to the far side and continuing the same diagonal line. Turning is automatically included this way. The back length is taken from the shoulder to waist plus the length of the diagonal line of the side extensions, and then extra to taste for the curve of the train.
The underskirt is then two full width drops of fabric or 6 drops of 50cm wide fabric from waist to hem (over hips) plus a generous turning (10cm.) Original skirts are between 5-7 drops, records describe openings being at the side or Centre Back. If a CB opening is desired then the joins should be turned to the sides and the CB fold slashed about 2 hand widths deep. The front will then also be on the fold.
The sleeves can be cut from a single drop of fabric approximately the same length as is used by the body. These vary greatly by decade but this allows for pleats and length to elbow.
Facings and cu s can be cut from the greyed out left over fabric or from a dedicated drop of your choice.
To alter for width the side seam on the front and back panels can be moved further out so that the diagonal line is entirely on the extensions.
This is based on my proportions and is very much a “guesstimate” as I tend to err on the side of extra length. Construction starts with joining the underskirt turning up the hem then pinning to the form which has been dressed with a petticoat . This ensures the hem is entirely across the grain and thus the waist will form a gentle wave.
The waist can be turned and overhanded to a waist tape (or two for side openings) the waist should be pleated or gathered, with the direction of pleats pointing to the back. This skirt should be lined or at least have a deep facing to allow the hem to hang neatly and with body.
The mantua will need a shaped lining that should be taken on the body or a stand correctly shaped with stays of the right shape.
This is then pinned to the form and the main fabric pleated over that.
The back of the mantua is the foundation for t so start at waist and pin up for the centre back and then fold the side backs as desired. The fabric can be slashed at the side to avoid wrinkles at the waist. The side seam should sit slightly to the back rather than strictly at the side.
The fronts of the mantua can be joined to the extensions (seam allowance to the outside for a later style, to the underside for earlier) and the full hem turned. This again allows for the hem to be entirely across the grain and the fronts can then be pinned and pleated on the form again aligning the hem to the correct level by taking up or letting down at the waist. Then pin the front pleats and slash the side waist to fit.
The front side should be folded in and the edge tacked to the back, the join between the extensions and back should be sewn so as to be on the inside once draped.